Installing Citrix Workspace app 2009 for Linux

It’s been a while since I’ve covered Citrix, so let’s cover Citrix Workspace app 2009 for Linux today.

There is good support for Linux as now they seem to be selling Raspberry Pis with custom versions of Citrix as thin clients.

I normally install the “Citrix Web Workspace app”, which appears to require a browser to work. So this time I decided to try out the “Citrix Workspace app” which is a stand alone application.

The install is easy enough on the Rasbian and Fedora installs I tried.

On Fedora this was
dnf install ./ICAClient-rhel-20.9.0.15-0.x86_64.rpm

For Raspberry Pi OS (Rasbian)
apt install ./icaclient_19.10.0.15_armhf.deb

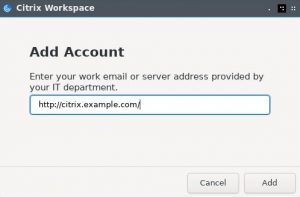
To run it you run /opt/Citrix/ICAClient/selfservice and you get a popup asking you to add account. I entered the normal url that was supplied by our IT department.

But of course life would not be complete without our Good Old SSL error. This time it takes the form of the message. “Your account cannot be added using this server address. Make sure you entered it correctly. An SSL connection to the server couldn’t be established because the server’s certificate was not trusted.”

We have seen this before and on Rasbian the solution remains the same. The certs are provided as individual files on Debian based distributions through the package ca-certificates.

# ls -al /etc/ssl/certs/ | head
total 580
drwxr-xr-x 3 root root 12288 Aug 20 12:45 .
drwxr-xr-x 4 root root 4096 Aug 20 12:32 ..
lrwxrwxrwx 1 root root 45 Aug 20 12:32 02265526.0 -> Entrust_Root_Certification_Authority_-_G2.pem
lrwxrwxrwx 1 root root 36 Aug 20 12:32 03179a64.0 -> Staat_der_Nederlanden_EV_Root_CA.pem
lrwxrwxrwx 1 root root 27 Aug 20 12:32 062cdee6.0 -> GlobalSign_Root_CA_-_R3.pem
....

On Fedora they are also provided by the package ca-certificates but they are all bundled into one file. Which openssl has a problem with, and so will citrix.

# ls -al /etc/ssl/certs/
total 12
drwxr-xr-x. 2 root root 4096 Sep 18 20:15 .
drwxr-xr-x. 5 root root 4096 Apr 23 14:10 ..
lrwxrwxrwx. 1 root root 49 Jun 17 01:00 ca-bundle.crt -> /etc/pki/ca-trust/extracted/pem/tls-ca-bundle.pem
lrwxrwxrwx. 1 root root 55 Jun 17 01:00 ca-bundle.trust.crt -> /etc/pki/ca-trust/extracted/openssl/ca-bundle.trust.crt
-rw-r-----. 1 root root 1189 Dec 18 2018 nlwsu86237.crt

And the cert that I require is in the bundle:

# grep -A 3 "# GlobalSign Root CA - R3" /etc/ssl/certs/ca-bundle.crt
/etc/ssl/certs/ca-bundle.crt:# GlobalSign Root CA - R3
/etc/ssl/certs/ca-bundle.crt------BEGIN CERTIFICATE-----
/etc/ssl/certs/ca-bundle.crt-MIIDXzCCAkegAwIBAgILBAAAAAABIVhTCKIwDQYJKoZIhvcNAQELBQAwTDEgMB4G
/etc/ssl/certs/ca-bundle.crt-A1UECxMXR2xvYmFsU2lnbiBSb290IENBIC0gUjMxEzARBgNVBAoTCkdsb2JhbFNp

Thankfully the the Citrix Page on the Arch Wiki has an explanation of what’s going on, and they also provide a solution. A slightly modified version for Fedora is provided:

cd /opt/Citrix/ICAClient/keystore/cacerts/
cp -v /etc/ssl/certs/ca-bundle.crt /opt/Citrix/ICAClient/keystore/cacerts/
awk 'BEGIN {c=0;} /BEGIN CERT/{c++} { print > "cert." c ".pem"}' < /etc/ssl/certs/ca-bundle.crt
openssl rehash /opt/Citrix/ICAClient/keystore/cacerts/*.pem

After that you should be able to login as normal and work productively.

Posted in citrix, General | Leave a comment

Finding an Android phone to run LineageOS

This is also available as a podcast on Hacker Public Radio.

Affordable phone that support school apps, and allow firewall.

TL;DR

Don’t, unless you are willing to loose the money you are paying.

Requirements

  • Supported for 3-5 years.
  • Apps = Android = LineageOS
  • Firewall = AFWall+ = Unlocked + Root
  • Affordable

Support

Getting a brand new phone means that Developers have not had time to release code.

Older phones are no longer available for purchase, and actually become more expensive.

Too old a version and apps are no longer supported.

Finding a phone that can be unlocked

I use a site called Tweakers.net which allows you to do parameter search.

Set the maximum price you are willing to pay.

The current version of Android is 10 so select only those. You want your phone to be supported for as long as possible.

Make any other selections that you think are critical, like memory, processor etc but be prepared to adjust this later.

In my case I selected a minimum of 4G Ram and 64G Storage the first time.

Sort by price low to high, and loop through, finding what support there is for TWRP. That will tell you how open the phone is. If the Manufacturer support (the spirit of) unlocking, then remove them from the list.

  • HTC support unlocking but not don’t give code to the developers so it’s useless.
  • Motorola support was good but since the take over by Lenovo they have stopped supporting unlocking.
  • Google phones are unlocked and are ideal for developers but are too expensive.
  • Xiaomi requires you to wait until the EU 14 day no questions asked warranty has expired.
  • Fairphone too expensive.
  • PinePhone may be an option but people report the current version being too slow.

After finding a phone that can be unlocked and rooted, then check to see if there is an official version for LineageOS

If no phone meets all the requirements then try the next one.

It’s very likely you will not find a phone. You are then faced with the choice of adjusting your parameters, for example picking a more expensive model, but at the end of the day be prepared that you may not find a phone.

If you do find a phone, it’s very likely that it may be a different version than the one supported. I have had to return several phones that I had unlocked and just hoped that the supplier would take them back and refund me.

Even on supported phones, especially newer ones, it’s quite often that a major piece of functionality will not work. I have had issues with no GPS on one phone, and bluetooth/wifi not working on another until files were manually edited on each reboot.

Do not do this if you want a stress free life, and also if you are not willing to accept the waste of all the money, and time involved.

Posted in Podcasts | 1 Comment

Setting up a local imap server

Setting up a local imap server

This is also available as a podcast on Hacker Public Radio.

To install a local imap daemon that will only listen to localhost connections, made via ssh tunneling. This is for use as a local backup of your imap files, or for keeping a remote backup somewhere.

This is not a mail delivery solution but rather a way to keep a backup of your email using to a MailDir directory that you can access using your email client. As each message is stored in its own file, you can also use normal tools like find|sed|awk|grep to find messages.

This setup can be installed locally or remotely on, for example, a raspberry pi. In that case you can enable a portforwarding rule in ~/.ssh/config to include something like LocalForward 127.0.0.1:2143 127.0.0.1:143

Install using aptitude install courier-imap courier-authdaemon

You can check the status using systemctl status courier-imap.service courier-authdaemon.service

Edit the file /etc/courier/imapd and modify the following settings:

Address to listen on, can be set to a single IP address.

    < ADDRESS=0
    > ADDRESS=127.0.0.1

Maximum number of IMAP servers started

    < MAXDAEMONS=40
    > MAXDAEMONS=80

Maximum number of connections to accept from the same IP address

    < MAXPERIP=20
    > MAXPERIP=40

The following setting is optional, and causes messages from the given folder to be automatically deleted after the given number of days.

    < IMAP_EMPTYTRASH=Trash:7
    > #IMAP_EMPTYTRASH=Trash:7

Change the directory name of the maildir directory.

    < MAILDIRPATH=Maildir
    > MAILDIRPATH=/home/pi/MailDir

Then restart the service using systemctl restart courier-imap.service courier-authdaemon.service.

When I did this I got a strange error about but installing the package gamin fixed it. Which is a Library providing the FAM File Alteration Monitor API.

  Filesystem notification initialization error -- contact your mail
  administrator (check for configuration errors with the FAM/Gamin library)
Posted in Podcasts | Tagged , , , | Leave a comment

Locating computers on a network

Locating computers on a network

This is also available as a podcast on Hacker Public Radio

Sometimes you may wish to locate a device on your network. It might be to find rogue devices, or to locate a new device be that a printer, an Internet of Things light bulb, or whatever. In my case I was trying to track down a RaspberryPi. Raspbian now lists the IP Addresses assigned to it when it first starts, but that requires a monitor to be connected.

Locating using your router.

This is by far the easiest way to find a new device but it is also the most manual. If you have access to the (WiFi) Router/DHCP server on your network then this should be a matter of logging in and getting the address from the menu area probably called Network or LAN or something like that. So first list all the computers that are on the network. Then turn on your pi, and see if a new one has joined. If you’re lucky it may even be labeled Raspberry Pi Foundation.

In my case I want to locate these devices automatically using a script. So below we will explore some ways that you can approach the problem of locating devices on your network. All of them rely on trying to find the mapping between an Ethernet MAC Address, and a IP Address. It will help to understand a little about how Ethernet works. This is a nice short overview, How does Ethernet work? (animated) by Janos Pasztor

ARP

I don’t know the network device you will be using so I’d like to share a few ways of doing this using the ARP protocol. This provides a mapping between a device’s permanent MAC address and their, often temporarily, assigned IP address.

When your computer 192.168.1.1 wants to talk to another device it will need to know the Ethernet MAC address of the other device. Let’s assume it wants to connect to the local printer 192.168.1.2 that is on the same network, and it knows its IP Address. If your computer has already heard the printer communicate on the network, it will have already added the printer’s IP address and MAC Address to its so called ARP table. Over time older entries will be removed from this table either because they are too old, or there were too many entries.

Linux has a command called arp which will show you a list of the IP addresses mapped to the MAC/HWaddress address.

# arp -n
Address                  HWtype  HWaddress           Flags Mask            Iface
192.168.1.254            ether   ff:ee:dd:cc:bb:aa   C                     eno1
192.168.1.2              ether   00:11:22:33:44:55   C                     eno1
192.168.1.1              ether   00:aa:bb:cc:dd:ee   C                     eno1

From a Internet Protocol (IP) point of view all your devices in your house are probably in the same Subnet(work). But what if you need to communicate outside your network? For example to ping a well known server 8.8.8.8 to check if you have an Internet Connection. The IP settings also include a Default gateway to send all traffic not intended for the local network.

Finding the Default gateway

Your computer will have many IP Addresses configured but it’s a good bet that the network you and your new pi are on is the same one as the default gateway is on. You can find the default gateway using the following command:

$ route -n | grep -E 'Destination|^0.0.0.0'
Destination     Gateway         Genmask         Flags Metric Ref    Use Iface
0.0.0.0         192.168.1.254   0.0.0.0         UG    100    0        0 eno1

It uses route to show the route table showing IP Addresses and not network names. The first column is Destination and so a 0.0.0.0 there means route everything else to and the to we get from the second column Gateway, which is our gateway.

You can also get the same information using the following command:

$ ip route show | grep default
default via 192.168.1.254 dev eno1 proto dhcp metric 100

And now to just show the IP Address.

$ route -n | awk '/^0.0.0.0/ {print $2}'
192.168.1.254

From an Ethernet point of view it needs to find the MAC address associated with your router/default gateway’s IP address 192.168.1.254, so that it can send Ethernet Frames to it. In our case the address is in the ARP table, but if it wasn’t then your computer would broadcast to everyone on the network using a special address ff:ff:ff:ff:ff:ff. When the router/default gateway replies that entry will be added to the ARP table.


739  5.328679069  00:aa:bb:cc:dd:ee  ff:ff:ff:ff:ff:ff  ARP  42  Who has 192.168.1.254? Tell 192.168.1.1
746  5.328911559  ff:ee:dd:cc:bb:aa  00:aa:bb:cc:dd:ee  ARP  60  192.168.1.254 is at ff:ee:dd:cc:bb:aa

Have a play with WireShark to see what is actually going on on your network. There is a good step by step walk through on Wireshark/Arp on wikiversity.

All RaspberryPi computers have an Ethernet MAC address starting with b8:27:eb or dc:a6:32. So if your computer and the new pi are on the same network you can look for new MAC addresses starting with b8:27:eb or dc:a6:32.

Foiled by the Switch

All is not plain sailing as most modern LAN‘s use switches to split up the broadcast domain.

Switches act as buffers, receiving and analyzing the frames from each connected network segment. Frames destined for nodes connected to the originating segment are not forwarded by the switch. Frames destined for a specific node on a different segment are sent only to that segment. Only broadcast frames are forwarded to all other segments. This reduces unnecessary traffic and collisions.

What this means is that although all your computers may be on one big IP network, the devices may be connected to different switches. For example a WiFi Router downstairs, a Cabled Switch in the back room, and a network extender in the attic. All are filtering out unnecessary traffic. While that is a good thing, it does mean that it may not ever see the traffic from the new Pi.

If we try and contact each and every IP Address on the network, that forces ARP “Who has?” traffic, and the answers that come back will be added to the arp table. There are a few ways to force this discovery.

Discovery by ping

One way to generate ARP traffic is to use the ping utility.

Ping measures the round-trip time for messages sent from the originating host to a destination computer that are echoed back to the source. The name comes from active sonar terminology that sends a pulse of sound and listens for the echo to detect objects under water.

To ping an IP Address, just type ping 192.168.1.1. That will send out a continuous ping which you can stop by pressing and holding the ctrl key and then pressing the letter c.

$ ping 192.168.1.1
PING 192.168.1.1 (192.168.1.1) 56(84) bytes of data.
64 bytes from 192.168.1.1: icmp_seq=1 ttl=63 time=0.547 ms
64 bytes from 192.168.1.1: icmp_seq=2 ttl=63 time=0.493 ms
64 bytes from 192.168.1.1: icmp_seq=3 ttl=63 time=0.422 ms
64 bytes from 192.168.1.1: icmp_seq=4 ttl=63 time=0.466 ms
^C
--- 192.168.1.1 ping statistics ---
4 packets transmitted, 4 received, 0% packet loss, time 3105ms
rtt min/avg/max/mdev = 0.422/0.482/0.547/0.045 m

We don’t actually care about the output, as the point here is to generate some traffic to see who is awake. So we can redirect output and errors to /dev/null. So a good command to do this would be:

ping -n -c 1 -W 1 192.168.1.1 >/dev/null 2>&1 &

The options used are to limit the traffic and wait time as much as possible:

-n Numeric output only.  No attempt will be made to lookup symbolic names for host addresses.
-c count. Stop after sending count ECHO_REQUEST packets. With deadline option, ping waits for count ECHO_REPLY packets, until the timeout expires.
-W timeout. Time to wait for a response, in seconds. The option affects only timeout in absence of any responses, otherwise ping waits for two RTTs.

In this solution we will try and ping every host on the network. It would be a bit tedious to do each one by one, so we will make a script to do this for us. It’s a very safe bet that your home network will have a private IP range of 192.168.???.0 to 192.168.???.255. This is not a safe assumption in an Office Environment but we can deal with that later.

So we will try and find the base part of the subnet 192.168.1.1 which will be 192.168.1 and then we will ping each address in turn.

base=$( ip route show | awk -F '\.|/| ' '/default/ {print $3"."$4"."$5}' )
for node in {1..254}
do
( ping -n -c 1 -W 1 ${base}.${node} & )
done

I’m assigning the base variable the first three parts of the IP Address and then I am cycling through all possible addresses sending out a ping (a sort of hello message) to each. By wrapping the whole thing in () we can fork each to run at the same time.

This will force some traffic between my computer and every computer on the network, which will fill up the arp table on my pc.

# arp -n
Address                  HWtype  HWaddress           Flags Mask            Iface
192.168.1.2              ether   00:11:22:33:44:55   C                     eno1
192.168.1.1              ether   00:aa:bb:cc:dd:ee   C                     eno1
192.168.1.10             ether   11:11:11:11:11:11   C                     eno1
192.168.1.25             ether   22:22:22:22:22:22   C                     eno1
192.168.1.3              ether   33:22:22:22:22:22   C                     eno1
192.168.1.5              ether   b8:27:eb:11:11:11   C                     eno1

And now we find all the computers that are on, and responding to pings on the network. We can see that there is one that starts with b8:27:eb|dc:a6:32, and it has an IP Address of 192.168.1.5.

# arp -n | grep -Ei 'b8:27:eb|dc:a6:32' | awk '{print $1}'
192.168.1.5

Putting it all together

base=$( ip route show | awk -F '\.|/| ' '/default/ {print $3"."$4"."$5}' )
for node in {1..254}
do
  (ping -n -c 1 -W 1 ${base}.${node} >/dev/null 2>&1 &)
done
arp -n | grep -Ei 'b8:27:eb|dc:a6:32' | awk '{print $1}'

Discovery by nmap

You should have permission in writing from your network administrator before you proceed with these steps.

Here I am going to use some of the commands above together with the tools nmap and ipcalc to locate and scan the network. This has the advantage of dealing with more exotic subnet masks.

Find the default interface

# route -n
Kernel IP routing table
Destination     Gateway         Genmask         Flags Metric Ref    Use Iface
0.0.0.0         192.168.1.254   0.0.0.0         UG    100    0        0 eno1
....

# route -n | grep -E '^0.0.0.0' | awk '{print $8}'
eno1

Find the ip and subnetmask for the default interface

# ifconfig eno1 | grep 'inet '
inet 192.168.1.1  netmask 255.255.255.0  broadcast 192.168.1.255

# ifconfig eno1 | grep 'inet ' | awk '{print $2"/"$4}'
192.168.1.1/255.255.255.0

Get the network from ipcalc

# ipcalc 192.168.1.1/255.255.255.0
Address:        192.168.1.1
Network:        192.168.1.0/24
Netmask:        255.255.255.0 = 24
Broadcast:      192.168.1.255

Address space:  Private Use
Address class:  Class C
HostMin:        192.168.1.1
HostMax:        192.168.1.254
Hosts/Net:      254

# ipcalc 192.168.1.4/255.255.255.0 | grep 'Network' | awk '{print $NF}'
192.168.1.0/24

Now call nmap to give the ip address and MAC address

# nmap -sn 192.168.1.0/24
Starting Nmap 7.40 ( https://nmap.org ) at 2017-07-05 20:57 CEST
Nmap scan report for 192.168.1.2
Host is up (0.0012s latency).
MAC Address: 00:11:22:33:44:55 (Acme industries)
Nmap scan report for 192.168.1.5
MAC Address: b8:27:eb:11:11:11 (Raspberry Pi Foundation)
Nmap scan report for local.lan (192.168.1.254)
Host is up.
Nmap done: 256 IP addresses (2 hosts up) scanned in 3.51 seconds


-sn (No port scan) This option tells Nmap not to do a port scan after host discovery, and only print out the available hosts that responded to the host discovery probes. This is often known as a “ping scan”, but you can also request that traceroute and NSE host scripts be run. In previous releases of Nmap, -sn was known as -sP.

Discovery by arp-scan

By far the easiest way to do this is using the dedicated tool called arp-scan, (Man Page)

# arp-scan --interface eno1 --localnet --numeric --ignoredups
Interface: eno1, type: EN10MB, MAC: 20:47:47:ca:24:a6, IPv4: 192.168.10.14
Starting arp-scan 1.9.7 with 256 hosts (https://github.com/royhills/arp-scan)
192.168.1.2     00:11:22:33:44:55       Acme industries
192.168.1.5     dc:a6:32:22:22:22       Raspberry Pi Trading Ltd
192.168.1.233   b8:27:eb:11:11:11       Raspberry Pi Foundation
192.168.1.254   e4:95:6e:00:00:00       IEEE Registration Authority

12 packets received by filter, 0 packets dropped by kernel
Ending arp-scan 1.9.7: 256 hosts scanned in 1.939 seconds (132.03 hosts/sec). 12 responded

Whichever option you chose I hope this helps you become more familiar with your network and the way it works.

Posted in Podcasts | Leave a comment

Ansible ping

This is also available as a podcast on Hacker Public Radio.

Here are some steps you need to should take when setting up Ansible for the first time.

Install the software

First you need to install the Ansible software. On Fedora that is as simple as a dnf install ansible, or on debian apt install ansible.

Confirm ssh working

Confirm that you can connect to the servers via ssh as you would normally.

ssh -i /home/my_user/.ssh/id_ed25519_pi my_user@192.168.0.1
ssh -i /home/my_user/.ssh/id_ed25519_pi your_username@192.168.1.2

Create a Inventory/Host file

Translate the ssh commands into a Inventory/Host file. I am using a YAML in this example but other variants are available.

all:
  hosts:
    my_server:
      ansible_host: 192.168.0.1
    your_server:
      ansible_host: 192.168.1.2
      ansible_ssh_user: your_username
  vars:
    ansible_connection: ssh
    ansible_ssh_user: my_user
    ansible_ssh_private_key_file: /home/my_user/.ssh/id_ed25519_pi

Ansible Ping

Check that your server is up and reported correctly in your file by having Ansible ping it. This should allow you to determine if at least there is a command and control connection available.

ansible --inventory-file my_inventory.yaml -m ping all

This uses the group all and will ping all servers under it. The reply below shows a positive and negative response.

my_server | SUCCESS => {
    "ansible_facts": {
        "discovered_interpreter_python": "/usr/bin/python"
    },
    "changed": false,
    "ping": "pong"
}
your_server | UNREACHABLE! => {
    "changed": false,
    "msg": "Failed to connect to the host via ssh: ssh: connect to host 192.168.1.2 port 22: No route to host",
    "unreachable": true
}

The msg will give you a clue as to what is going wrong and you should try to ssh directly with the Ansible credentials again, and then try and ping using Ansible.

ansible --inventory-file my_inventory.yaml -m ping your_server

Modify the Inventory file until you have managed to get a successful reply.

Create a playbook

Work on your playbook and verify that it is valid yaml.

---
- name: Test Ping
  hosts: all
  tasks:
  - action: ping

Confirm the YAML is valid

If there is no reply all is good.

yamllint ~/my_example.yaml

If there is no reply all is good. For your reference I will remove the line and this is the response.

yamllint ~/my_example.yaml
/home/user/my_example.yaml
  1:1       warning  missing document start "---"  (document-start)

Confirm the syntax is valid

Then verify that the playbook is sane

ansible-playbook --syntax-check ~/my_example.yaml

If there is no reply all is good. For your reference I will remove the hosts line and this is the response.

ansible-playbook --syntax-check ~/my_example.yaml
ERROR! the field 'hosts' is required but was not set

Confirm everything works together

After that you should be able to run the playbook using.

ansible-playbook --inventory-file my_inventory.yaml ~/my_example.yaml

PLAY [Test Ping] ***************************************************************************************************

TASK [Gathering Facts] *********************************************************************************************
[WARNING]: Platform linux on host my_server is using the discovered Python interpreter at /usr/bin/python, but
future installation of another Python interpreter could change this. See
https://docs.ansible.com/ansible/2.9/reference_appendices/interpreter_discovery.html for more information.
ok: [my_server]
fatal: [your_server]: UNREACHABLE! => {"changed": false, "msg": "Failed to connect to the host via ssh: ssh: connect to host 192.168.1.2 port 22: No route to host", "unreachable": true}

TASK [ping] ********************************************************************************************************
ok: [my_server]

PLAY RECAP *********************************************************************************************************
my_server                  : ok=2    changed=0    unreachable=0    failed=0    skipped=0    rescued=0    ignored=0   
your_server                : ok=0    changed=0    unreachable=1    failed=0    skipped=0    rescued=0    ignored=0
Posted in General, Podcasts | Leave a comment

Android/LineageOS refreshing every screen, every second

TL;DR Turn off “Phone Audio” in the Bluetooth headset.

I have had a very strange problem with my LineageOS phone over the last week or two. Every screen intermittently started refreshing every second or so. Side menus disappeared, videos when back to the start, keyboard prediction went nuts. I hadn’t changed my hardware setup at all and could not get to the root cause. I did a clean install again but the problem remained which lead me to think that it may be a hardware problem with the phone.

Just my luck that the problem only seemed to happen when I went on breaks, or during my commute. During my work day the phone preformed fine.

I use a cheap Bluetooth headset to listen to podcasts but I didn’t think that was the issue as it’s been working fine for a year or more. However I happened to be looking at the screen while I turned them on, and wouldn’t you know the problem started. I turned off Bluetooth and the problem went away. Finally turning off “Phone Audio” fixed the issue entirely.

This issue is limited to this adapter only and other headsets don’t have the problem.

Posted in General | Leave a comment

Android Firewalled Wi-Fi connection reports no Internet and won’t connect

Background

You’re running a firewall on your work and home networks right, so of course you’re running one on your Smart Phone. Given this device holds more information about you than you probably know yourself, it would be only prudent to make sure that you are protecting what gets in but also what gets out.

I run AFWall+ which is available from the F-Droid app store. It runs fine on LineageOS.

I then set it on the children’s phone so that no application is allowed to use mobile data, and then only applications that need Internet get Internet Access. This works well as it’s a normal use case for mobile applications to have intermittent access to the Internet.

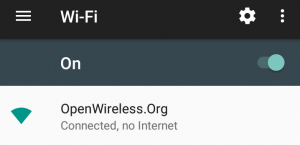
I see no reason why the Linux Kernel should need unfettered access to the Internet, so it’s not allowed out. One issue you may come across is that even though you know that there is a Connection your phone doesn’t, and will display the Wi-Fi Connected, no Internet message.

I’m not sure how this check is done but abqnm suggests at in the StackExchange question How does Android determine if it has an Internet connection? that it may be related to Google Cloud Messaging.

… this means that the device is unable to receive a response from GCM (Google Cloud Messaging, the framework that handles push notifications). This traffic is sent through ports 5228, 5229, and 5230. If the AP is blocking or interfering with traffic on those ports, push notifications won’t work …

I do indeed see blocked attempts by Google Play Services on my own phone, but not on the other phones that have no google services installed. The only entry I see in the logs is an ICMP attempt to “Comcast Cable Communications, Inc”. If you know more please record a show for Hacker Public Radio about it.

Giving Access

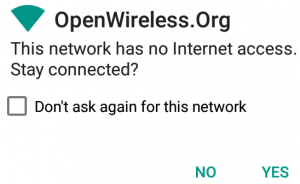
Normally you will get a message saying that the Wi-Fi has no Internet access.

If you tap the message a popup will allow you to stay connected and will let you remember the choice.

In some cases the router helpfully resets the connection before you can reply to the message meaning it goes into a loop continually popping up the message but not reacting to it.

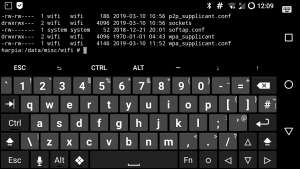
In this case we can use Termux a Android Terminal emulator, to drop to a shell and fix the problem.

I used su to get root access but you could also change to the user wifi.

The file you need to edit is /data/misc/wifi/wpa_supplicant.conf. It’s probably best to edit this file with the wifi off.

network={
	ssid="OpenWireless.Org"
	key_mgmt=NONE
	priority=15
	id_str="{snip}"
}

Scroll down to the network that is giving you trouble and add disabled=1

network={
	ssid="OpenWireless.Org"
	key_mgmt=NONE
	priority=15
	disabled=1
	id_str="{snip}"
}

I ended up copying the file to the sdcard, and editing it there. I then copied it back as su and used chown wifi:wifi /data/misc/wifi/wpa_supplicant.conf to fix the permissions.

Once that’s done you can reboot the phone and connect to the network without a problem. You should also consider putting up an Open Wireless access point yourself.

This is available as a podcast on HPR2810

Posted in Podcasts | Tagged , | Leave a comment

Resizing images for vcard on Android

I have had problems importing vcards onto my Android phone. After a lot of troubleshooting, I tracked it down to embedded images in the card. The PHOTO;VALUE field to be precise.

Some images worked and some didn’t, and looking at the properties some that worked were larger than others that didn’t. In the end I tracked down a post on stackoverflow that hinted that the aspect ratio was important. And sure enough it was.

starting with jelly bean (4.1), android now supports contact images that are 720×720.
before, starting with ICS (4.0), android has supported contact images that are 256×256.
and before that, contact photos had just a size of a thumbnail – 96×96.

Stack exchange

I tried a 720×720 on a few phones but decided to settle on 256×256 for now. 

To do image manipulation, I tend to use the GraphicsMagick tools instead of the more popular ImageMagick suite. You should be able to achieve the same result in either.

My requirements were:

  • The images should be scaled so that the maximum height/width shrinks to 256, maintaining the aspect ratio.
  • The images should always be 256×256 in size.
  • Scaled images should be padded and centered on a white background.
  • All color profile information should be removed.

To use an example I took the following image and saved it as Linus_Torvalds.jpg

By Krd (photo)Von Sprat (crop/extraction) – File:LinuxCon Europe Linus Torvalds 03.jpg, CC BY-SA 4.0, Link

Step one is to use the -size 256×256 option which you would think would do the scaling, but in fact it only reduces the file to 366×509 which is not what I expected.

$ gm convert -size 256x256 "Linus_Torvalds.jpg" Linus_Torvalds_1.jpg
$ gm identify Linus_Torvalds_1.jpg Linus_Torvalds_1.jpg JPEG 366x509+0+0 DirectClass 8-bit 56.1Ki 0.000u 0m:0.000002


However it appears that the option is used when creating new files, and is also used by the processor to determine the intended target size. Which is why I left it in. So what we actually need is the -resize option.


$ gm convert -size 256x256 "Linus_Torvalds.jpg" -resize 256x256 Linus_Torvalds_2.jpg
$ gm identify Linus_Torvalds_2.jpg
Linus_Torvalds_2.jpg JPEG 184x256+0+0 DirectClass 8-bit 47.7Ki 0.000u 0m:0.000001s

So this has done a good job at scaling the image down. It’s now scaled correctly so that the biggest edge is scaled down to 256. In this case it was the height but the width is now shorter than what we need. We do want to maintain the aspect ratio so that we don’t distort the image but 184×256 is not 1:1 aspect ratio nor is it the needed dimensions of 256×256.

The solution to this is to use the -extent command.

$ gm convert -size 256x256 "Linus_Torvalds.jpg" -resize 256x256 -extent 256x256 Linus_Torvalds_3.jpg
$ gm identify Linus_Torvalds_3.jpg
Linus_Torvalds_3.jpg JPEG 256x256+0+0 DirectClass 8-bit 48.0Ki 0.000u 0m:0.000001s

This gives us the correct size and a 1:1 aspect ratio, but the image is left justified. To fix this we need to use the -gravity command. That needs to be the first argument of the command. Finding the correct order of the commands took some trial and error.

$ gm convert -gravity center -size 256x256 "Linus_Torvalds.jpg" -resize 256x256 -extent 256x256 Linus_Torvalds_4.jpg
$ gm identify Linus_Torvalds_4.jpg
Linus_Torvalds_4.jpg JPEG 256x256+0+0 DirectClass 8-bit 48.5Ki 0.000u 0m:0.000001s

Finally we remove all profile information using +profile which should make the image more generic.

$ gm convert -gravity center -size 256x256 "Linus_Torvalds.jpg" -resize 256x256 -extent 256x256 +profile "*" Linus_Torvalds_5.jpg
$ gm identify Linus_Torvalds_5.jpg
Linus_Torvalds_5.jpg JPEG 256x256+0+0 DirectClass 8-bit 5.7Ki 0.000u 0m:0.000001s

Putting it all together we get.

gm convert -gravity center -size 256x256 "big-image.jpg" -resize 256x256 -extent 256x256 +profile "*" "256x256_image.jpg"

You should now be able to add these images to vcards without any problem.

Here is a one liner to create 96×96 256×256 and 720×720 thumbnails of all the jpg images in a directory.


for image in *jpg;do for size in 96x96 256x256 720x720; do gm convert -gravity center -size ${size} "${image}" -resize ${size} -extent ${size} +profile "*" "thumbnail-${size}-${image}";done;done

Also available as a podcast on Hacker Public Radio

Posted in General, Podcasts | Leave a comment

Preventing USB access

I have a Raspberry Pi next to my main workstation which I use for email. To control it I use the excellent Synergy Application over a ssh tunnel which means that I don’t need an extra keyboard or mouse. This works great especially as Remote Keyboard Locking is supported by xscreensaver and Synergy. Once I lock the main workstation the Pi also locks.

However I also want to stop people been able to simply walk up and plug in a keyboard and mouse. To prevent this I followed the instructions of Sergey Manucharian on Stackoverflow to disable usb via udev.


# cat /etc/udev/rules.d/99-disable-usb-hid.rule
SUBSYSTEMS=="usb", DRIVERS=="usbhid", ACTION=="add", ATTR{authorized}="0"


Of course anyone could take the sdcard out and remove this line. In my case this isn’t an issue as it’s a default image and I don’t store anything on there.

Posted in General | 2 Comments

Citrix receiver error 1000119

I’m just going to redirect to the answer by Peter on AskUbuntu. In my case I renamed the cacerts directory and then symlinked it.

# mv /opt/Citrix/ICAClient/keystore/cacerts/ /opt/Citrix/ICAClient/keystore/cacerts.orig
# ln -s /etc/ssl/certs /opt/Citrix/ICAClient/keystore/cacerts


Posted in citrix | Leave a comment