I have released an update to this blog post: See CheckPoint SNX install instructions for major Linux distributions
In what is becoming a bit of a series, today I’ll be covering how to get Check Point SSL Network Extender installed under kubuntu. From the checkpoint site:
SSL Network Extender is a browser plug-in that provides clientless remote access, while delivering full network connectivity for any IP-based application.
It works based on java so the first thing you will need to install is sun’s java runtime client. You will need the partner repository installed and your system updated.
sudo apt-get install sun-java6-jre sun-java6-plugin sun-java6-fonts
Once that is done you can restart Firefox and browse over to java.com to make sure that you have java working.
You should see a message like this:
Verified Java Version
Congratulations!
You have the recommended Java installed (Version 6 Update 24).
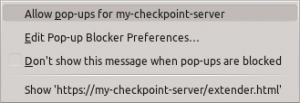
Once java is working you can go to the snx website. If you don’t know the url ask your network administrator. You may be notified about popups so just allow them for your site.
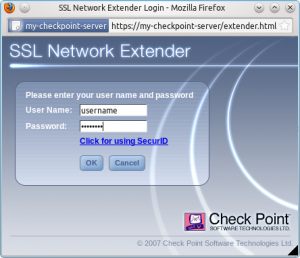
 Once you have accepted and reloaded the page you will be prompted to enter your username and password.
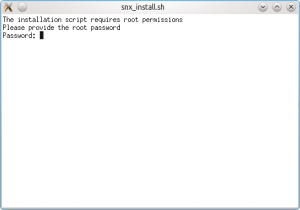
 After this you will be asked to install an update to the software. This installs the snx software in the background. One thing to note is that it is looking for the root password and not the sudo password. Ubuntu ships without this set so you’ll need to set a root password using the following command.
sudo passwd
You can confirm it’s set correctly using the command
su -
and if you see the prompt change to “#” then you know it’s working. Switch back to the snx_install.sh window and enter the password.
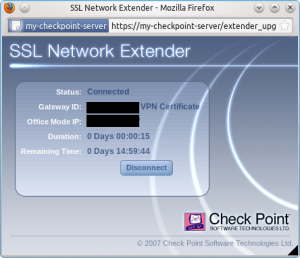
 Once you do that you should very briefly see a message saying that the install was successful. At this point the standard snx software is installed but you will probably see the error
Failed to initialize
When you run the snx client on the command line you will see:
user@pc:~$ snx
snx: error while loading shared libraries: libstdc++.so.5: cannot open shared object file: No such file or directory
The solution is to install libstdc++5
sudo aptitude install libstdc++5
Once that is done typing snx should be error free and give you something like this:
user@pc:~$ snx
failed to open file: /home/username/.snxrc
Valid attributes are:
- server          SNX server to connet to
- sslport         The SNX SSL port (if not default)
- username        the user name
- certificate     certificate file to use
- calist          directory containing CA files
- reauth          enable automatic reauthentication. Valid values { yes, no }
- debug           enable debug output. Valid values { yes, 1-5 }
- cipher          encryption algorithm to use. Valid values { RC4 / 3DES }
- proxy_name      proxy hostname
- proxy_port      proxy port
- proxy_user      username for proxy authentication
user@pc:~$
You’re still not home and dry because you may need to accept the VPN Certificate. To get around this you need to login via the command line and press “Y”.
user@pc:~$ snx -s my-checkpoint-server -u username
Check Point's Linux SNX
build XXXXXXXXXXXX
Please enter your password:
SNX authentication:
Please confirm the connection to gateway: my-checkpoint-server VPN Certificate
Root CA fingerprint: AAAA BBB CCCC DDD EEEE FFF GGGG HHH IIII JJJ KKKK
Do you accept? [y]es/[N]o:


Thanks! After about 6 months of trying to figure this out… This worked like a charm!
Hello i had same problem, but i used window 7..can you tell me the above step for win 7? especially in handling failed to initialize error
regards
Bobby
I’m also using Windows 7 with Java 29 installed and am getting the same error message. Failed to initialize.
OMG!
I needed this info to get some things done at work.
Thank you very much!!
Hello i had same problem, but i used window 7..can you tell me the above step for win 7? especially in handling failed to initialize error
Nice one Ken! Works nicely on my UBUNTU desktop at SR 🙂
Next we have to configure UBUNTU’s Firestarter to allow the CheckPoint VPN connectivity!
Open a terminal from Ubuntu’s “Applications” menu: Applications | Accessories | Terminal.
Copy the lcommand below, and paste it into the terminal by right clicking in the terminal and selecting “Paste” from the context menu (the ctrl-v method won’t paste in Terminal).
Command :
If you’re prompted for a password, enter the sudo/root password.
Now it is time to add the iptables entries. Type the ip address of your peer/endpoint (the ip you connect to using CheckPoint) into the example below:
***************************************************************************
iptables -A INPUT -j ACCEPT -s xxx.xxx.xxx.xxx -p esp
iptables -A INPUT -j ACCEPT -s xxx.xxx.xxx.xxx -p udp -m multiport -sports isakmp,10000
iptables -A INPUT -j ACCEPT -i tun+
iptables -A OUTPUT -j ACCEPT -d xxx.xxx.xxx.xxx -p esp
iptables -A OUTPUT -j ACCEPT -d xxx.xxx.xxx.xxx -p udp -m multiport -dports isakmp,10000
iptables -A OUTPUT -j ACCEPT -o tun+
***************************************************************************
Where xxx.xxx.xxx.xxx is your snx end-point.
Copy these iptables entries (above)
Click back to the terminal we opened.
Paste the iptables entries into the Terminal by right clicking in the nano editor and selecting “Paste” from the context menu.
Hold down the ctrl key and hit o on the key board (ctrl-o). This will save the iptables entries to your user-pre file. Press . Exit the nano editor, but not the terminal (ctrl-x).
Now, restart the Firestarter firewall:
sudo /etc/init.d/firestarter restart
Now, you should be able to vpnc to your peer and maintain a remote desktop connection 🙂
Man, thanks, thats exactly what I needed!
Thank you very much!!!
I have finally configured my Unbuntu 12.4 (32bits) properly!
For your blog readers I report the sequence of howto that I have followed:
http://www.wikihow.com/Install-Oracle-Java-on-Ubuntu-Linux
http://www.wikihow.com/Enable-Oracle-Java-in-Your-Web-Browsers-on-Ubuntu-Linux
https://kenfallon.com/check-point-ssl-network-extender/
Is it possible to have a topic for the ubuntu 12.10 beta1 x64 ???
Sorry I’m not running it atm, however I’m happy to give you a hand with installing it.
This is great. Thanks! (Running on 12.10).
One question: It takes over the whole screen, and the keyboard. How do you switch between it and the Ubuntu desktop?
Hi Steven,
I don’t use Unity desktop but I imagine you can use ALT+Tab
Ken.
Works for …
Description: Ubuntu 12.10
Release: 12.10
Codename: quantal
Thank you!
Hello Sir,
This page still works until now. Im keeping this page for reference.
Thanks
Works perfect in Ubuntu 12.10!! Thanks a lot !!
I have to replace ‘aptitude’ by ‘apt-get’ in libstdc++5 installation (I don’t know why, i’m a begginer with Linux O.S.)
Worked like a charm! Thanks 😉
In Ubuntu:
1.If U Get This Error:
error while loading shared libraries: libstdc++.so.5:
cannot open shared object file: No such file or directory
sudo apt-get install ia32-libs
2.If U get This Error:
snx: error while loading shared libraries: libpam.so.0: cannot open shared object file: No such file or directory
sudo apt-get install libpam0g:i386
Solutions to Errors:
error while loading shared libraries: libstdc++.so.5:
cannot open shared object file: No such file or directory
sudo apt-get install ia32-libs
snx: error while loading shared libraries: libpam.so.0: cannot open shared object file: No such file or directory
sudo apt-get install libpam0g:i386
Excellent!! it worked after months of looking for a solution…
Thanks a lot!
Very helpful! I used it for Suse Linux 13.2 64 bit
Thanks a lot!
hello, this got me longer than i got up untill now, im using gentoo and now it just says connecting, when running from terminal i pres accept on connection to gateway and get :
SNX: Connection aborted.
any ideas?
thanks very much!!
Thanks man. It actually worked. You saved lot of my time.
Pingback: ubuntu ssl vpn – Java Platform, Android and all in between
Hello, I’m using debian 8, I have installed all packages (ldd shows that is ok), and i get:
SNX: Conection aborted
Anyone has any idea, please?
Thanks in advance.
Debian
cat /etc/debian_version
8.7
#dpkg –add-architecture i386
#apt-get update
#apt-get install libstdc++5:i386 libpam0g:i386 libx11-6:i386
#ldd /usr/bin/snx
linux-gate.so.1 (0xf779e000)
libX11.so.6 => /usr/lib/i386-linux-gnu/libX11.so.6 (0xf7630000)
libpthread.so.0 => /lib/i386-linux-gnu/i686/cmov/libpthread.so.0 (0xf7614000)
libresolv.so.2 => /lib/i386-linux-gnu/i686/cmov/libresolv.so.2 (0xf75fb000)
libdl.so.2 => /lib/i386-linux-gnu/i686/cmov/libdl.so.2 (0xf75f6000)
libpam.so.0 => /lib/i386-linux-gnu/libpam.so.0 (0xf75e6000)
libnsl.so.1 => /lib/i386-linux-gnu/i686/cmov/libnsl.so.1 (0xf75cd000)
libstdc++.so.5 => /usr/lib/i386-linux-gnu/libstdc++.so.5 (0xf7513000)
libc.so.6 => /lib/i386-linux-gnu/i686/cmov/libc.so.6 (0xf7365000)
libxcb.so.1 => /usr/lib/i386-linux-gnu/libxcb.so.1 (0xf733f000)
/lib/ld-linux.so.2 (0xf77a1000)
libaudit.so.1 => /lib/i386-linux-gnu/libaudit.so.1 (0xf7319000)
libm.so.6 => /lib/i386-linux-gnu/i686/cmov/libm.so.6 (0xf72d3000)
libgcc_s.so.1 => /lib/i386-linux-gnu/libgcc_s.so.1 (0xf72b6000)
libXau.so.6 => /usr/lib/i386-linux-gnu/libXau.so.6 (0xf72b1000)
libXdmcp.so.6 => /usr/lib/i386-linux-gnu/libXdmcp.so.6 (0xf72ab000)